How to Add a New Contact Box
The Contact box is a gray box located in the right column of UAlbany web pages. It should contain contact information specific to your department. Below is an example.


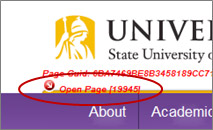
- Open the foundation page by clicking on the Open Page red dot below the Minerva symbol in the logo. This will reveal options for adding new and editing existing page pieces.

- On the right side of the page, in the purple area, click on the Manage Right Content red dot. This will open a new Edit Link Element window.

- Select Create and Connect Page from the menu. This will open a new Content Class Groups window.

- Select Content Pages from the Content Class Groups menu. This will bring up a list of Content Classes below the Content Class Groups menu.

- Select Contact Box – Grey – Multi-Section from the List of Content Classes menu. This will open the Edit Headline window.

- In the Edit Headline box add the name of your site in front of the content class name. Make note of the 5-digit Page ID number and delete it from the end of the headline. Using consistently titled headlines will help you search for this page piece later if you want to add it to other pages. You can also search by the Page ID.

- Click the OK button in the bottom right of the page. This will bring you back to the SmartEdit window.

- You should see a new blank grey box in the right column. This box will hold text for the contact information.

- Click on the Manage Text Pages red dot above the new grey box you just created. This will open a new Edit Link Element window.

- Select Create and Connect Page from the Edit Link Element menu. This will open the Edit Headline box.

- Enter a descriptive headline in the Enter the headline field.

- Click the OK button in the bottom right of the page. This will bring you back to the SmartEdit window. You will now see two new red dots in the grey box.

- Click on the Edit Text red dot. This will open the Text Editor window.
- Type in your department's name, address and contact information in the Text Editor. You can add a link to your faculty/staff directory and any social media icons in this area as well.

- Click the OK button on the bottom right of the page. This will bring you back to Smart Edit.

- Your Contact box is now complete and ready to be published.

